
Continuous Integration with Jenkins and GitLab


Enter the credential manager


Go into system credentials


Add a new credential
(private key of slave node where you want to run the job)
We need a SSH private key credential. I’m not sure the username matters, but I set it to “git” as that is what the login for gitlab uses. I then pointed it to my *private* key on the machine and gave it a description.


Now the key shows up in the system.

Once I had setup the ssh private key, which allows Jenkins to connect to the git host over ssh (i.e. git clone git@server:user/repo.git), I needed to setup API Access for Jenkins to get metadata from GitLab.


In GitLab go to your user profile.


Select “Access Tokens”.


Now make a new token, I gave it a descriptive name and made it expire at the end of the decade (I haven’t investigated the pros/cons of expiration date length yet).


You are then presented with a screen showing the token. Copy it now, as it won’t be accessible again! You can always create a new one if you mess it up though. (FYI I have revoked the token shown above)


Back in Jenkins’s System credentials add a new one of the type GitLab API token. Paste in the API token shown in the last step.


Now the API link has been added.
Once the API Access has been setup, we can configure the connection between Jenkins and GitLab. This happens in the Mange Jenkins -> Configure System menu.


Give it a name, the host where GitLab’s API lives, and the credential for the token created in the last step.

Now that our connection between Jenkins and GitLab is setup, we need to create a job. I’ve only worked with freestyle jobs, so if you’re doing a pipeline you’ll be on your own from here on out.


You’ll see that the connection you just made is automatically selected.


In the source code management section, enter the ssh URL of your repository. Select the ssh key generated above. Then we need to do the unique items.

We need to specify the name as “origin”, which will be used by the other sections. For the Refspec we need to input:
+refs/heads/*:refs/remotes/origin/* +refs/merge-requests/*/head:refs/remotes/origin/merge-requests/*
I haven’t completely figured out how this works, but it seems to be correct for my use cases.
For the Branch Specifier we need
origin/${gitlabSourceBranch}
which will be filled in based on the web hook we’ll be setting up next.


For the trigger we want to set it up for changes going in to GitLab.


Finally, in the post build step we need to “Publish build status to GitLab commit”. This enables the feedback and gives us pretty indicators in GitLab.


That’s everything from the Jenkins side. Now we need to setup the GitLab side to trigger the builds. We’ll do this with webhooks, and we’ll need one per Jenkins job.


From the GitLab project you want to build, select the Webhooks option from the settings menu on the right.
You need to enter the URL of the jenkins server. The path is “project/JOB_NAME”. Select Push events and Merge Request Events.


Now everything should be set! If you push a commit to the repository, you should see the Jenkins job start running. Once the job completes, you should see the status next to the commit in GitLab.


Here’s a few commits with their build result status.


Clicking on the status icon shows some info about the build. Clicking on that Build ID (#6253) will take you to the Jenkins page for that build.
This setup works great for individual commits that are pushed into the repo. However, it also works fine for handling merge requests (despite some of the wording on the Jenkins GitLab Plugin’s readme page). I was able to have merge requests from separate branches in the same repo as well as from forked repos trigger builds and show the resulting status.
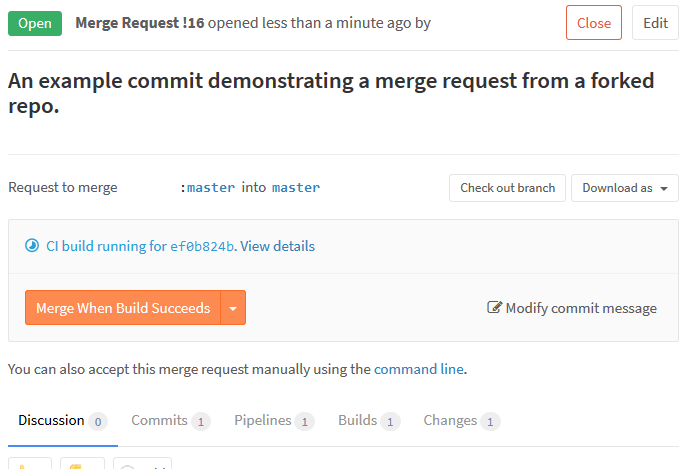

Merge request while the build is in progress.


Comments

Popular posts from this blog

Script To Monitor disk Usage

Hello All, Many times we have a requirement to automate few of the tasks, and one of the important task is to delete old log files from log destination. We usually get the conditions where we have to delete the log from particular directory when it reaches to some thresh hold value. Now a day the requirement of automation is highly increased where we are seeing most of the day to day tasks are getting automated using different scripting languages. Its always a good idea to automate your daily tasks which will save your working hours and will increase your productivity. Most of the time log destination gets full and due to which we face other issues like application down or particular service stop working. And manual deleting of log is hectic process so below script will help you to delete your log data when it meets your condition, and also it will trigger mail to recipient after deletion of logs. You can schedule this script in your crontab according to your feasible ti...

Azure Active Directory

  What is Azure Active Directory? Azure Active Directory is Microsoft’s multi-tenant, cloud-based directory and identity management service. For an organization, Azure AD helps employees sign up to multiple services and access them anywhere over the cloud with a single set of login credentials. Azure Active Directory Concept: It is important to understand these Azure AD concepts. Identity . An object that can get authenticated. An identity can be a user with a username and password. Account . An identity that has data associated with it. You can't have an account without an identity. Azure subscription . Used to pay for Azure cloud services. You can have many subscriptions and they're linked to a credit card. Azure tenant/directory . A dedicated and trusted instance of Azure AD, a Tenant is automatically created when your organization signs up for a Microsoft cloud service subscription. More instances of Azure AD can be created. Azure AD is the underlying product ...

Azure Storage

Azure Storage is Microsoft's cloud storage solution for modern data storage scenarios.    Why Azure Storage: Durable and Highly Available: ·        Data is safe during hardware failure. ·        Replicate data across data centres. ·        In local catastrophe or natural disaster data replicated to other data centres remains highly available. Secure: ·        Data encrypted by Azure service Storage Service encryption (SSE) for data at rest. ·        Completed control over who access your data. Scalable: ·        Designed to massive scale. Managed: ·        Azure handles maintenance, updates and critical issues. Accessible: ·        Accessible from anywhere in the world. ·        You can access using http, https,...

Connect SparkThriftServer with Tableau/PowerBI

  Connect SparkThriftServer with Tableau/PowerBI REFERENCE : https://docs.microsoft.com/en-us/azure/hdinsight/hdinsight-apache-spark-use-bi-tools Use Power BI for Spark data visualization Note This section is applicable only for Spark 1.6 on HDInsight 3.4 and Spark 2.0 on HDInsight 3.5.   Once you have saved the data as a table, you can use Power BI to connect to the data and visualize it to create reports, dashboards, etc.   1.       Make sure you have access to Power BI. You can get a free preview subscription of Power BI from http://www.powerbi.com/ . 2.       Sign in to Power BI . 3.       From the bottom of the left pane, click Get Data . 4.       On the Get Data page, under Import or Connect to Data , for Databases , click Get . 5.       On the next screen, click Spark on Azure HDInsight and then click Connect . When prompted, enter th...